

Did you know that coloring books can reduce stress by up to 75%? As you embark on creating your own illustrations, you’ll discover the joy of transforming simple shapes into intricate designs. Each step, from sketching to final touches, plays a crucial role in your artistic journey. Ready to explore the techniques that will elevate your artwork and captivate your audience? Let’s unravel the process together.
Key Takeaways
- Start by breaking down complex illustrations into simple shapes, like circles and squares, to form the base of your designs.
- Gather inspiration from nature, local markets, and various media to brainstorm themes and characters for your coloring book.
- Create initial sketches using loose lines to explore ideas, then refine them into clean line art with consistent pressure and steady strokes.
- Choose the right paper type, ensuring it supports your medium and prevents bleed-through for a better coloring experience.
- Share your designs with peers for feedback, and iterate based on constructive criticism to enhance your artwork and engage your audience.
Understanding the Basics of Shapes and Forms
As you dive into the world of drawing for coloring books, understanding the basics of shapes and forms becomes essential.
Shape recognition is your starting point; every intricate design begins with simple forms. Picture circles, squares, and triangles as the building blocks of your illustrations.
Once you grasp these shapes, move on to form analysis. Observe how these shapes transform into more complex figures—how a circle morphs into a face or a triangle into a mountain.
Experiment with combining shapes to create whimsical characters or enchanting landscapes. Each stroke brings your imagination to life, so let your pencil dance across the page.
Gathering Inspiration for Your Illustrations
While exploring the world around you, inspiration for your illustrations can strike from the most unexpected places.
Take a stroll through a local market, where vibrant fruits and flowers create a tapestry of colors begging for your attention. Capture visual inspiration from unique patterns on textiles or the intricate details of architecture.
Don’t forget nature; a walk in the park can reveal whimsical creatures and enchanting landscapes. Engage in theme brainstorming by jotting down ideas sparked by these encounters, whether it’s a fantastical garden or a cozy café scene.
Dive into books, films, or online galleries; they can ignite your creativity and lead to fresh concepts.
Sketching Out Your Ideas
Once you’ve gathered your inspiration, it’s time to put pencil to paper and sketch out your ideas. Start with loose, flowing lines to capture your initial thoughts—don’t worry about perfection just yet.
Use brainstorming techniques to explore different elements, like characters or themes, jotting down quick notes beside your doodles. Concept mapping can help you visualize relationships between ideas, creating a web of possibilities.

As you sketch, let your imagination run wild; think about how each element interacts within your coloring book. Experiment with different shapes and styles, allowing your creativity to flourish.
Creating Clean Line Art
To create stunning line art that pops on the page, you’ll want to start with the right tools that suit your style.
Focus on techniques that ensure your lines are crisp and clean, allowing your designs to shine in their final form.
With the right approach, your artwork will be ready to spark joy and creativity in every colorist’s hands.
Choosing the Right Tools
Choosing the right tools is crucial for creating clean line art that captivates and engages. The right combination of pencil types and ink options can elevate your artwork, ensuring vibrant, crisp lines.
Here are some essential tools to consider:
- Graphite Pencils: Use a range from H (hard) to B (soft) for sketching and refining your ideas.
- Fine Liners: Opt for archival ink pens in various widths for outlining your drawings.
- Brush Pens: These provide flexibility and can create both fine and bold lines, adding character.
- Erasers: A kneaded eraser gently lifts graphite without damaging the paper, keeping your lines clean.
With these tools in hand, you’ll be set to create stunning line art that truly pops!
Techniques for Clean Lines
Mastering the art of clean lines involves a blend of precision and technique that can transform your sketches into eye-catching illustrations. Focus on line stability by using consistent pressure with your tools, ensuring that your strokes remain smooth and even. Practice contour control by outlining shapes with fluid movements, allowing your hand to follow the curves naturally.
| Technique | Description |
|---|---|
| Steady Hand | Maintain a relaxed grip for smooth lines. |
| Consistent Pressure | Apply even pressure to avoid breaks. |
| Practice Regularly | Sketch frequently to build muscle memory. |
Finalizing Your Artwork
Refining your artwork into clean line art can feel like a thrilling transformation, as your initial sketches evolve into polished illustrations. To achieve this, focus on evaluating composition and refining details, ensuring every line serves a purpose.
Here’s how to elevate your work:
- Clean up your sketches: Erase any unnecessary lines and stray marks.
- Emphasize focal points: Use bolder lines for elements you want to stand out, guiding the viewer’s eye.
- Vary line thickness: Incorporate different widths to add depth and interest to your illustrations.
- Check for balance: Ensure your design feels harmonious, adjusting elements as needed.
With these steps, your artwork won’t only be visually appealing but also ready for coloring enthusiasts!
Adding Depth and Texture
Adding depth and texture to your coloring book drawings can transform a flat image into a captivating scene that invites the viewer to explore every detail.
Start by employing shading techniques—use cross-hatching or stippling to create shadows and highlights that enhance dimensionality. Think about where the light hits your subjects; this’ll guide your shading decisions.
Next, incorporate texture patterns to suggest different surfaces; for instance, wavy lines can represent water, while dotted patterns can evoke the softness of fur.
Incorporating Themes and Motifs
As you delve into the world of coloring book illustrations, incorporating themes and motifs can elevate your work, creating a cohesive narrative that resonates with your audience.
To achieve thematic cohesion, think about how motif variations can enhance your designs. Consider these elements:
- Nature: Flowers, trees, and animals can evoke tranquility and connection.
- Fantasy: Dragons, fairies, and mythical creatures invite imagination and wonder.
- Seasons: Incorporating seasonal elements can create a sense of time and change.
- Cultures: Use symbols and patterns from various cultures to add depth and diversity.
Exploring Different Styles and Techniques
With a solid foundation in themes and motifs, you’re ready to explore the myriad of styles and techniques that can bring your coloring book illustrations to life.
Dive into the minimalist style, where less truly is more. Embrace clean lines and open spaces, allowing colorists to express their creativity without overwhelming details.
Alternatively, let your imagination soar with whimsical illustrations filled with playful characters and fantastical landscapes. Think swirling clouds, dancing flowers, and curious creatures that invite a sense of wonder.
Experiment with varying line weights, textures, and patterns to enhance your designs. By blending these approaches, you’ll create a vibrant coloring book that captivates and inspires, encouraging every artist to fill your pages with their unique visions.
Preparing Your Artwork for Coloring
As you gather your tools, remember that the right paper can make all the difference in your coloring adventure.
Set up your workspace to be both inspiring and functional, where every stroke of your pencil flows effortlessly across the page.
With a bit of thoughtfulness, you’ll create a canvas that invites vibrant colors to dance.
Choosing the Right Paper
When selecting the right paper for your coloring book artwork, consider how the texture and weight can enhance the overall experience. The right choice not only supports your artistic vision but ensures vibrant colors and smooth application.
Here are some key factors to keep in mind:
- Paper Types: Look for options like smooth, textured, or watercolor paper to match your style.
- Paper Weight: Aim for a weight of at least 120gsm to prevent bleed-through from markers or heavy colors.
- Finish: A matte finish can offer better grip for pencils, while glossy paper enhances ink vibrancy.
- Durability: Choose acid-free paper to preserve your artwork over time.
With these tips, you’ll create a delightful coloring experience for your audience.
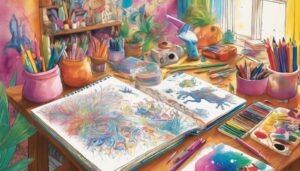
Setting Up Your Workspace
Creating the perfect workspace for your coloring book artwork can significantly enhance your artistic process.
Start by organizing your workspace; keep your tools—pencils, pens, and erasers—within easy reach in neatly arranged containers. A clean, clutter-free surface lets your creativity flow without distractions.
Next, consider your lighting. Natural light is ideal, so position your desk near a window if possible. If you need artificial lighting, opt for bright, adjustable lamps that minimize shadows and reduce eye strain.
Surround yourself with inspiring visuals, like color palettes or completed pieces, to spark your imagination.
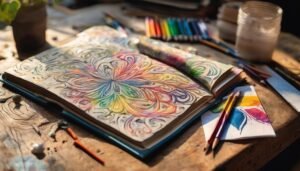
Finalizing Your Design and Getting Feedback
Once you’ve poured your creativity into your design, fine-tuning the details becomes essential for transforming it into a captivating coloring page. This stage is where your artwork truly begins to shine.
Consider these steps for finalizing your design and gathering valuable feedback:
- Review your lines: Ensure they’re smooth and clear, inviting to color.
- Add variety: Introduce different patterns or textures to engage users.
- Seek peer review: Share your work with friends or fellow artists for fresh perspectives.
- Embrace constructive criticism: Use feedback as a tool for enhancement, rather than a setback.
Frequently Asked Questions
What Materials Do I Need for Drawing Illustrations?
You’ll need a variety of pencil types for sketching—graphite for shading, colored for vibrancy. Grab some ink pens for crisp outlines, ensuring your illustrations pop with detail and clarity, ready for vibrant coloring adventures!
How Do I Choose a Color Palette for My Designs?
Imagine a cozy autumn scene; you’d choose warm, earthy tones for color harmony. For your designs, consider seasonal palettes like spring’s vibrant pastels or winter’s cool blues to evoke specific emotions and enhance your artwork’s impact.
Can I Use Digital Tools for Creating Coloring Book Illustrations?
Absolutely, you can use digital illustration techniques with coloring book software! These tools let you create vibrant designs, experiment with colors, and easily refine your artwork, making the illustration process both fun and efficient.
What Is the Ideal Paper Type for Coloring Books?
For coloring books, choose paper with a weight of at least 80 lb, providing durability. Opt for smooth textures for markers and textured options for colored pencils, ensuring a delightful experience as colors vibrantly pop on the page.
How Can I Copyright My Coloring Book Designs?
“An ounce of prevention is worth a pound of cure.” Start by filing for trademark registration and securing design rights. This’ll protect your unique coloring book designs from unauthorized use, ensuring your creativity stays yours.
Conclusion
As you wrap up your coloring book illustrations, think of your work like a garden. Each sketch is a seed, planted with care and nurtured with creativity. Just as a gardener tends to their flowers, you refine your designs, adding depth and texture. When you step back and admire your vibrant creations, you’ll see how each line and shape blossoms into a world waiting to be filled with color. So keep cultivating your imagination; beautiful art is just a stroke away!
