

Are you looking to create adorable and handmade footwear for your little one? Look no further!
In this informative and engaging article, we will guide you through the process of crocheting baby shoes.
From gathering supplies to adding cute embellishments, we will provide detailed instructions and helpful tips to ensure your crochet project is a success.
So, grab your yarn and hook, and let’s get started on creating beautiful and comfortable baby shoes.
Key Takeaways
- Gather essential supplies: crochet hook, yarn, and tapestry needle
- Choose the right yarn and hook size for your project
- Understand crochet patterns and troubleshoot common mistakes
- Finish and assemble the shoes with closures, embellishments, and proper stitching techniques
Gathering Supplies
The first step in crocheting baby shoes is gathering the necessary supplies. This includes a crochet hook, yarn, and a tapestry needle. Sourcing materials is an essential aspect of any crochet project, as it ensures that you have everything you need before you start.
When choosing a crochet hook, consider the size and material. The size of the hook will determine the size of the stitches, so it is important to select the correct size for the pattern you are following.
Yarn selection is equally important, as different types of yarn can produce different textures and thicknesses. Consider the softness and durability of the yarn, as it will be in contact with the baby’s delicate skin.
A tapestry needle is necessary for weaving in loose ends and sewing the finished pieces together.
Preparing the workspace is also crucial for a successful crochet project. Ensure that you have enough space to work comfortably and that your supplies are easily accessible. Clear any clutter from your work area to avoid distractions and create a focused environment.

Additionally, good lighting is essential to prevent eye strain and ensure accurate stitch placement. Organizing your materials in a way that makes sense to you will save you time and frustration during the crocheting process.
Choosing the Right Yarn
When selecting yarn for your crochet project, it is important to consider both the texture and thickness, as different types of yarn can yield varying results. The choice of yarn color is also crucial, as it can greatly impact the overall look and appeal of your finished project. Different types of yarn fibers are available in the market, each with its own unique characteristics and benefits.
One of the most common types of yarn fibers used in crochet projects is acrylic. Acrylic yarn is known for its affordability, durability, and wide range of colors. It is a great choice for beginners as it is easy to work with and can withstand frequent washing.
Another popular choice is cotton yarn. Cotton has a natural, soft feel and is ideal for projects that require breathability, such as baby clothes or summer accessories. It is also hypoallergenic, making it suitable for those with sensitive skin.
For those looking for a luxurious option, wool yarn is a great choice. Wool is warm, soft, and has excellent insulating properties. It is perfect for winter garments and accessories.
When it comes to choosing yarn colors, it is important to consider the intended use of your project. Bright, vibrant colors are great for children’s items, while neutral or pastel shades are more suitable for adult garments or home decor. Ultimately, the choice of yarn color is a matter of personal preference and should align with the purpose and aesthetic of your project.
Selecting the Perfect Hook Size
To achieve the desired tension and gauge in your crochet project, it is essential to experiment with different hook sizes and, if necessary, adjust your technique accordingly. The size of the hook you choose can greatly impact the final product, and understanding the advantages of using smaller hooks is key to achieving the best results.
Here are four ways in which hook size affects the final product:
Stitch Definition: Smaller hooks create tighter stitches, resulting in a more defined and structured fabric. This is particularly beneficial when crocheting intricate patterns or delicate items like baby shoes.
Gauge Control: Using a smaller hook allows you to control the gauge more precisely. This is important when following a pattern that requires specific measurements, ensuring your finished piece matches the intended size.
Drape and Flexibility: Smaller hooks produce a denser fabric that has less drape and flexibility. This is advantageous when crocheting items that require stiffness and stability, such as hats or baskets.
Yarn Consumption: Smaller hooks use less yarn compared to larger hooks. If you are working with limited yarn or want to create a more economical project, using a smaller hook can help you achieve this.
Understanding Crochet Patterns
An understanding of crochet patterns is essential for successfully creating intricate designs and achieving desired results in your crochet projects. Crochet patterns serve as a guide, providing you with step-by-step instructions on how to create various stitches and combine them to form beautiful designs. By understanding these patterns, you can unlock a world of creative possibilities and develop your crochet skills to their fullest potential.
To help you grasp the importance of understanding crochet patterns, let’s take a look at a table that highlights some common stitch techniques and their corresponding symbols:
| Stitch Technique | Symbol |
|---|---|
| Single Crochet | sc |
| Double Crochet | dc |
| Half Double Crochet | hdc |
| Treble Crochet | tr |
| Slip Stitch | sl st |
By familiarizing yourself with these stitch techniques and their symbols, you can easily follow crochet patterns and create stunning projects. However, even with a thorough understanding of crochet patterns, mistakes can still happen. Let’s discuss some common crochet mistakes and how to troubleshoot them:
Uneven tension: If your stitches appear loose or tight, practice maintaining a consistent tension throughout your work.
Miscounted stitches: Double-check your stitch count at the end of each row to ensure accuracy.
Incorrect stitch placement: Pay close attention to the pattern instructions and place your stitches in the correct spaces.
Starting With the Sole
I will now discuss how to start crocheting baby shoes by first creating the sole. Crocheting baby shoes can be a fun and rewarding project, allowing you to create adorable footwear for the little ones in your life. Here are some steps to get you started on making the sole:
Choose the yarn and hook size: Select a soft and durable yarn suitable for baby shoes. The hook size will depend on the thickness of the yarn you choose. A smaller hook size will create a tighter stitch, while a larger hook size will result in a looser stitch.
Start with a magic ring: A magic ring is a technique used to create a tight and seamless start for crocheting in the round. It provides a sturdy foundation for the sole of the baby shoe.
Work single crochet stitches: Begin by working single crochet stitches into the magic ring. The number of stitches will depend on the size of the shoe you want to make. Follow the pattern instructions for the specific design you are following.
Increase stitches: To shape the sole, you will need to increase stitches evenly across each round. This will allow the sole to widen gradually. Be sure to keep track of your stitch count to ensure a symmetrical shape.
Design Options:
- Experiment with different yarn colors to create unique and personalized baby shoes.
- Add embellishments such as buttons, bows, or flowers to enhance the design.
- Try different stitch patterns or textures for added visual interest.
- Consider using contrasting colors for the sole and upper part of the shoe to create a stylish look.
Troubleshooting Tips:
- If the sole starts to curl up, you may need to adjust your tension or use a smaller hook size.
- If the shoe is too tight, you can try using a larger hook size or adding extra stitches in the increase rounds.
- If the shoe is too loose, you can decrease stitches in the increase rounds or use a smaller hook size.
- If you encounter any difficulties with the pattern, refer to online tutorials or seek help from experienced crocheters.
By following these steps and considering design options and troubleshooting tips, you can create beautiful and comfortable baby shoes that will be cherished by both parents and little ones.
Happy crocheting!
Working on the Upper Part
When working on the upper part of the baby shoe, it is important to carefully stitch the edges together with a slip stitch and then continue crocheting in the desired stitch pattern. This step ensures that the shoe remains secure and comfortable for the baby. Once the edges are stitched, you can begin to incorporate lace patterns and color combinations to add a touch of elegance and charm to the shoe.
Lace patterns can be created by using different crochet stitches such as chain stitches, double crochet stitches, and picot stitches. These delicate patterns can be used to create beautiful designs on the upper part of the shoe, adding a touch of sophistication. Additionally, you can experiment with color combinations to create a visually pleasing aesthetic. Pastel shades are often used for baby shoes, but you can also opt for bold and vibrant colors to make a statement.
When working with lace patterns and color combinations, it is important to pay attention to detail. Ensure that the stitches are evenly spaced and that the colors complement each other. Take your time to carefully execute each stitch to create a high-quality finished product.
Adding Button or Lace Closure
To enhance the functionality and aesthetic appeal of the baby shoe, consider adding a button or lace closure, which will not only secure the shoe in place but also add a charming touch. Here are some reasons why incorporating a button or lace closure is beneficial for baby shoes:
Security: A button or lace closure ensures that the shoe stays securely on the baby’s foot, preventing it from slipping off or getting lost. This is especially important for active babies who are constantly moving and exploring.
Adjustability: Both button and lace closures allow for easy adjustment, ensuring a comfortable fit for the baby’s growing feet. This feature is particularly useful as babies’ feet tend to grow quickly.
Style: Adding a button or lace closure adds a stylish and sophisticated element to the baby shoe. It can transform a simple shoe into a fashionable accessory, perfect for any occasion or outfit.
Ease of Use: Buttons and laces are easy to use and can be operated by parents or caregivers with ease. This makes putting on and taking off the shoes a hassle-free experience.
Incorporating a button or lace closure to baby shoes not only adds functionality but also enhances the overall look and appeal. It provides security, adjustability, style, and ease of use, making it a valuable addition to any baby shoe design.
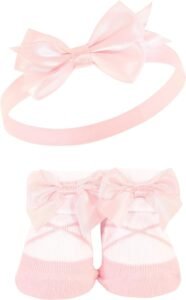
Creating Cute Embellishments
The incorporation of adorable bows and whimsical appliques can elevate the cuteness factor of baby shoes, creating eye-catching embellishments that will captivate both parents and little ones alike.
When it comes to crocheting baby shoes, there are endless possibilities for adding these delightful details. One way to enhance the design is by exploring different crochet stitch variations. By using stitches such as the shell stitch or the popcorn stitch, you can create a textured and visually interesting surface. These stitches add depth and dimension to the shoes, making them even more appealing.
Another popular option is to add pom poms to the baby shoes. These soft and fluffy accents instantly add a touch of playfulness and charm. They can be attached to the toe area or along the sides of the shoes, creating a fun and whimsical look.
Whether you choose to use crochet stitch variations or add pom poms, these embellishments will make the baby shoes stand out and bring joy to both the wearer and those who see them.
Finishing and Assembling the Shoes
To ensure a seamless final product, it is essential to carefully execute the finishing and assembling of the shoes, combining all the components into a cohesive and functional footwear. The assembling techniques and finishing touches play a crucial role in creating a high-quality and visually appealing pair of shoes.
Here are four key elements to consider when finishing and assembling shoes:
Stitching: Proper stitching is vital to ensure the durability and longevity of the shoes. Use strong and sturdy threads that match the color of the shoes. Double stitching can provide extra reinforcement in areas that experience more wear and tear.
Trimming: After assembling the shoes, carefully trim any excess threads or fabric to create a clean and polished look. Pay attention to small details like trimming the edges of the soles and around the openings of the shoes.
Gluing: In addition to stitching, using a high-quality adhesive can further strengthen the bond between different shoe components. Apply the glue evenly and avoid excess glue to prevent any unsightly marks or damage to the materials.
Finishing touches: Add decorative elements like bows, buttons, or embroidery to enhance the aesthetic appeal of the shoes. These finishing touches can make the shoes stand out and add a personalized touch.
Tips and Tricks for Crocheting Baby Shoes
One helpful tip for crocheting baby shoes is to select a soft and breathable yarn that will provide comfort for the baby’s delicate feet. Baby shoe sizing is an important consideration when crocheting, as you want to ensure a perfect fit. It is recommended to measure the baby’s feet and refer to a sizing chart to determine the appropriate size.
Different crochet stitches can be used to create adorable and functional baby shoes. The single crochet stitch is commonly used as it creates a tight and sturdy fabric. The double crochet stitch is another popular choice as it allows for more flexibility and breathability. Additionally, incorporating decorative stitches such as the shell stitch or the popcorn stitch can add a unique and stylish touch to the baby shoes.
It is also important to pay attention to the finishing touches, such as adding buttons or ribbons for added charm. By following these tips and utilizing different crochet stitches, you can create beautiful and comfortable baby shoes that will keep those little feet cozy and stylish.
Frequently Asked Questions
Can I Use a Different Type of Closure Instead of a Button or Lace for the Baby Shoes?
Different closure options for baby shoes include Velcro straps, elastic bands, or toggles. These alternatives can provide convenience and ease of use for parents while ensuring a secure fit for the baby. Additionally, alternative materials like ribbons or fabric ties can also be used for closures.
What Are Some Common Mistakes to Avoid While Crocheting Baby Shoes?
When crocheting baby shoes, it is important to be aware of common mistakes to avoid. By following these tips and tricks, you can ensure a successful outcome and create beautiful and functional footwear for little ones.
How Do I Adjust the Size of the Baby Shoes for a Larger or Smaller Foot?
When it comes to adjusting the size of baby shoes, there are several sizing alternatives available. By making simple modifications in the pattern, such as changing hook size or adding or removing stitches, you can create shoes that fit larger or smaller feet.
Can I Use a Different Type of Yarn for the Baby Shoes if I Don’t Have the Recommended Yarn?
When it comes to crocheting baby shoes, it is possible to use a different type of yarn if the recommended yarn is not available. Additionally, there are alternative closure options that can be considered.
Are There Any Specific Care Instructions for Washing and Drying the Crocheted Baby Shoes?
When it comes to caring for crocheted baby shoes, it is important to follow specific washing and drying instructions. Proper care will help maintain the quality and durability of the shoes, ensuring they last as long as possible.
Conclusion
Crocheting baby shoes is a delightful and creative way to make unique and personalized gifts for little ones. By gathering supplies, choosing the right yarn, and selecting the perfect hook size, you can create adorable and comfortable shoes.
Understanding crochet patterns and following the steps to start with the sole, add closures, and create cute embellishments will ensure a beautiful end result.
With these tips and tricks, you’ll be well-equipped to crochet charming baby shoes that will surely bring joy to both parents and babies. Remember, the possibilities are endless when it comes to adding your own personal touch!